


Introduction to Moku Cloud Compile
Moku Cloud Compile (MCC) is a feature of Liquid Instruments Moku products allowing a user to run custom logic inside the Moku device. The basic workflow for creating this custom logic is to:
- Log in to the MCC Web IDE and create a project
- Write your HDL logic, upload logic from a converter tool or load an example
- Build the design
- Deploy the design to your Moku.
All Moku Cloud Compile modules are just VHDL entities that provide the Architecture of the CustomWrapper entity. The CustomWrapper defines signal input ports, signal output ports, and control registers and is pre-defined by Liquid Instruments. The following snippet shows the first two outputs being driven by the sum and difference of the first two inputs. In a typical configuration, the input ports may be digitized signals from the ADCs or from other instruments; the outputs may be connected to other instruments or directly to the DACs. For more examples, see the Examples page or Examples repository.

The inputs and outputs have varying scales depending on the hardware configuration and signal source. For details on how to use the inputs and outputs of the CustomWrapper, refer to the MCC Documentation.
Once you have such an entity, you need to deploy it to your Moku. This guide will show you how.
MCC Beta
MCC is currently in Open Beta. The workflow below will change as the product approaches a full release. If you find any inconsistencies in this documentation, please ensure that your Moku Application (desktop and/or iPad) is up to date, then reach out to support@liquidinstruments.com.
Finding the Documentation
For the most up-to-date documentation, see the Moku Cloud Compile documentation site or click the Help button in the bottom-left of the web-based IDE screen after logging in.
Logging in to Moku Cloud Compile
Moku Cloud Compile uses a web-based Integrated Development Environment (IDE) in which you write your code and build your designs. Open the page at https://compile.liquidinstruments.com.
If this is your first visit, sign up for an account or log in immediately with a Google account. If you have already created a Username and Password, enter them on the log-in screen.
Sign-up is free during the Open Beta period.
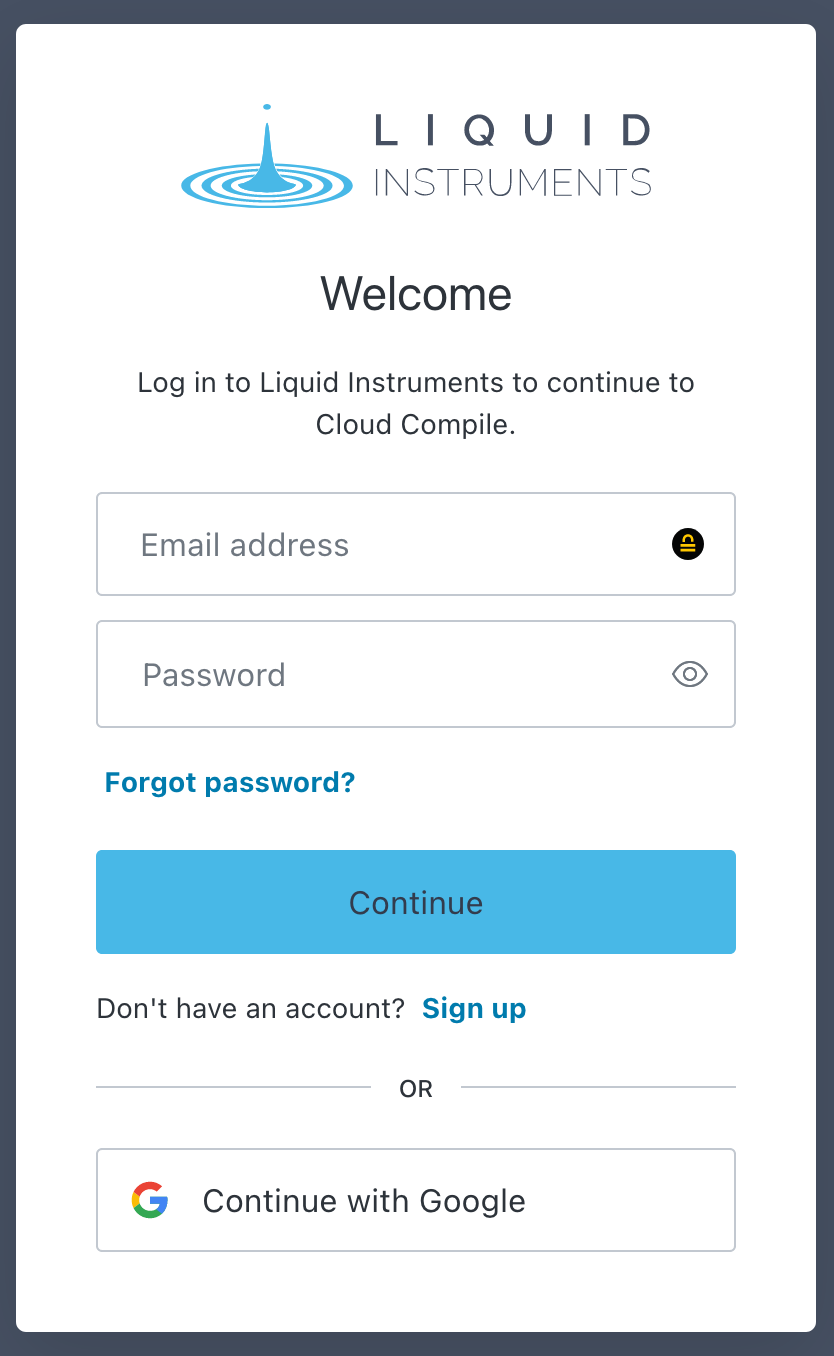
The Moku Cloud Compile log-in screen
Writing your First Design
Create a Project
The first screen the IDE shows you is the Projects screen. Create a new project using the button in the top-right.
Write your Code
Create a new file from the Files tab on the left and enter a file name. Your code can be written in the editor pane on the right. For example, after entering the simple example code from the introduction above, your IDE screen may look like this:

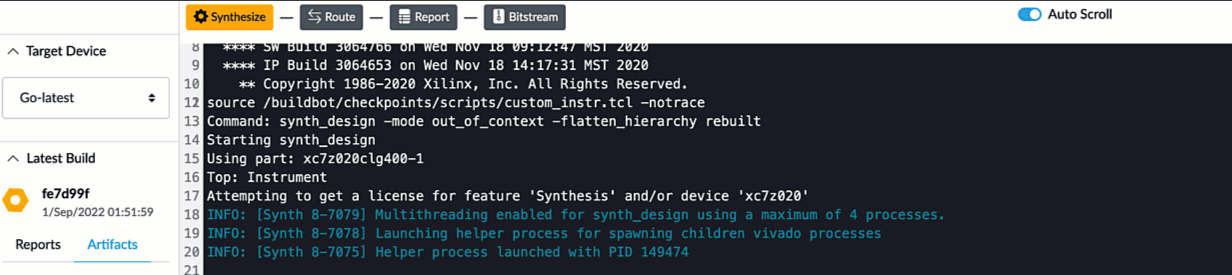
Building
To build your design, you must target a particular device. A device is a combination of hardware (e.g. Moku:Pro or Moku:Go) and firmware (e.g. version 568). Additionally, select the appropriate number of slots, 4 for Moku:Pro or 2 for Moku:Go
Find your Firmware Version
On the Desktop App, right-click your Moku, select Device Info and note the Firmware Version. On the iPad, you can see this information by long-pressing your device.
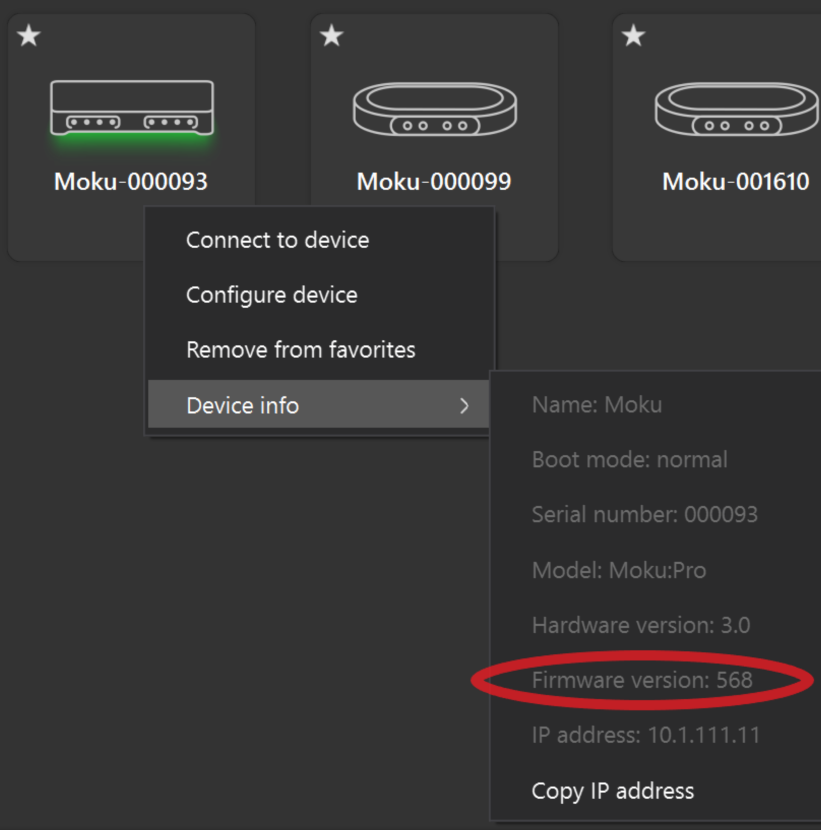
Find your firmware version in the Device Info screen in the Moku Application
Create or Update your Device
On the Devices screen, add a new device or edit an existing one. The hardware and firmware versions must match those on your Moku exactly.
Firmware Mismatch
Trying to deploy an MCC design on a Moku with a different firmware version to that for which it was built can cause the Moku to hang, requiring a power cycle.
Build your Design
In your MCC project:
- Select your newly-created device in the Target drop-down
- Build your project
- Expand the logs panel to view progress. When all indicators are green, click
bitstream.tar.gzto download the build artifact to deploy to your Moku
The build time depends on the hardware platform and project complexity. A simple project on Moku:Go will build in 3-5 minutes while Moku:Pro designs may take up to half an hour.

Deploying
With your build downloaded, the next step is to upload the design on to your Moku. The easiest way to do this is to use the Moku’s built-in web interface.
Find your IP Address
The Moku device’s IP address is on the same screen as its firmware version, see above.
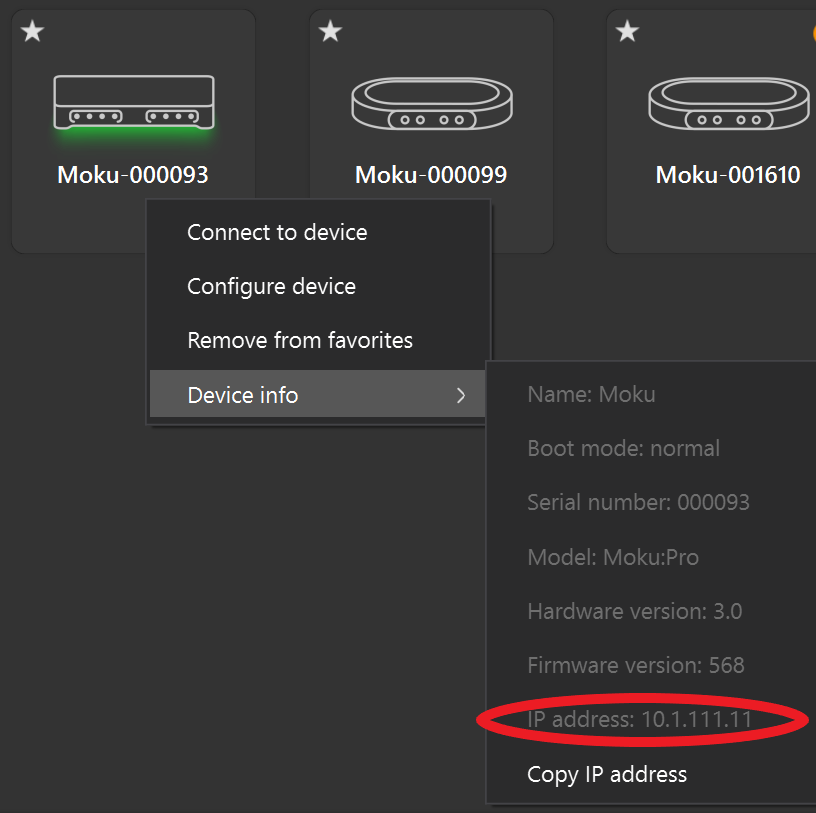
Find your Moku’s IP address in the Device Info screen of the Moku Application
Upload in the Moku Web Interface
Navigate to that IP address in your browser. For example, if you found your Moku device’s IP was 10.1.111.11 then visit http://10.1.111.11.
- Select
Registersin the top-right. Your screen may differ, depending what is currently running on your Moku. - Upload your MCC Design file in the Upload bitstream box.
IPv6
Note that this step requires that you visit your Moku’s control interface in a browser. Limitations of modern browsers mean that this is not possible if you’re using IPv6 “Link Local” addresses, including for example if you’re connecting to your Moku over USB. For more information and possible solutions, see the API documentation

Deploy in Multi-Instrument Mode
With your design now on your Moku, your design will now be deployed whenever you put a “Cloud Compile” instrument in a slot in Multi-instrument Mode (MiM). Use the MiM configuration screen to deploy your design alongside any other instruments that may be required. You can also use this screen to configure routing between your MCC design and other instruments and/or the physical BNC connectors on your Moku.
- Add at least one Cloud Compile instrument to your MiM configuration
- Apply the settings to start your design running
Once the MiM configuration is applied, you can edit your design’s Control Registers by clicking in to the deployed Cloud Compile instrument. For more information, see Control Registers.
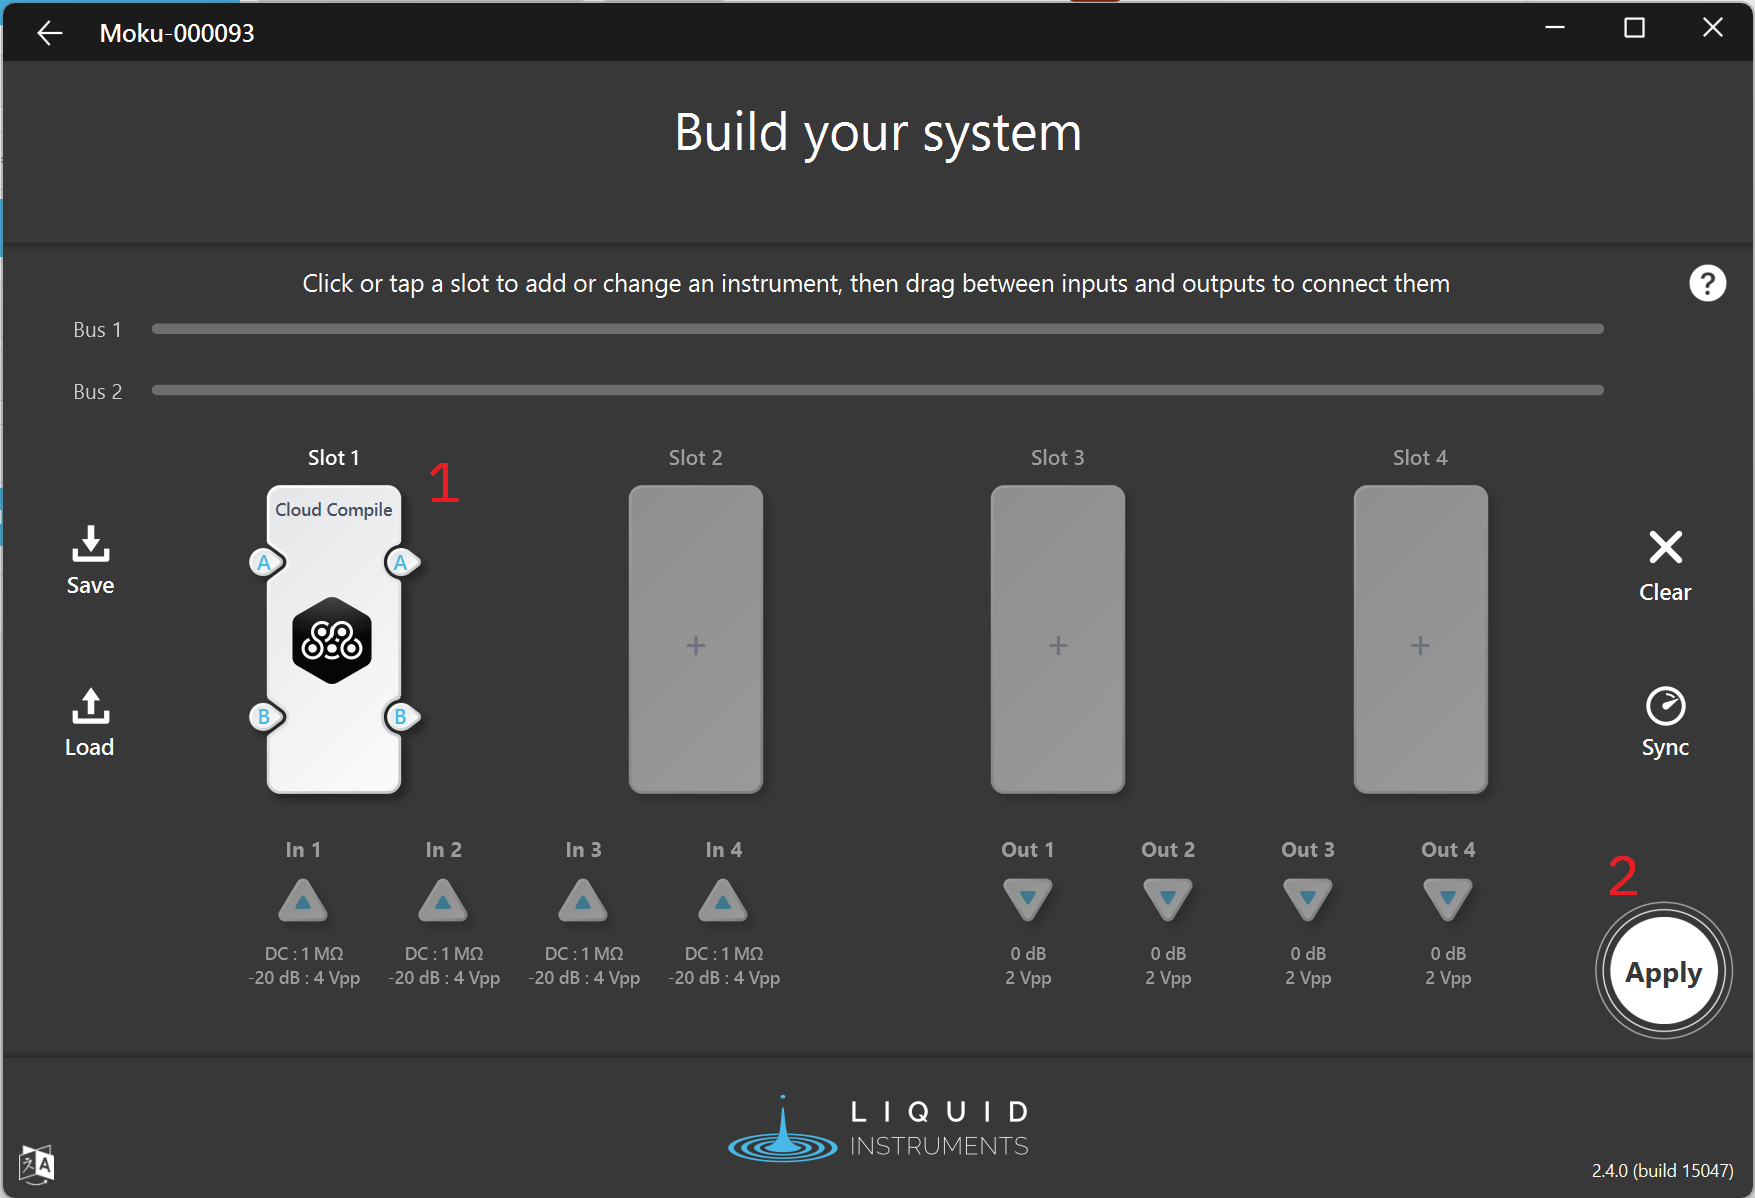
Moku Cloud Compile designs are deployed using the System Builder in Multi-instrument Mode
Combine with Other Instruments
Moku Cloud Compile is deployed in Multi-instrument Mode, so you have access to all your Moku instruments to stimulate, view and characterize your MCC design. For example, the “sum and difference” example used above can be tested by combining with a Waveform Generator and an Oscilloscope. The configuration, on the left, also has the Waveform Generator signals and the Sum-and-Difference signals routed to DACs. The Oscilloscope image on the right shows the sum and difference results of a 1Vpp sine wave and a 100mVpp ramp wave.
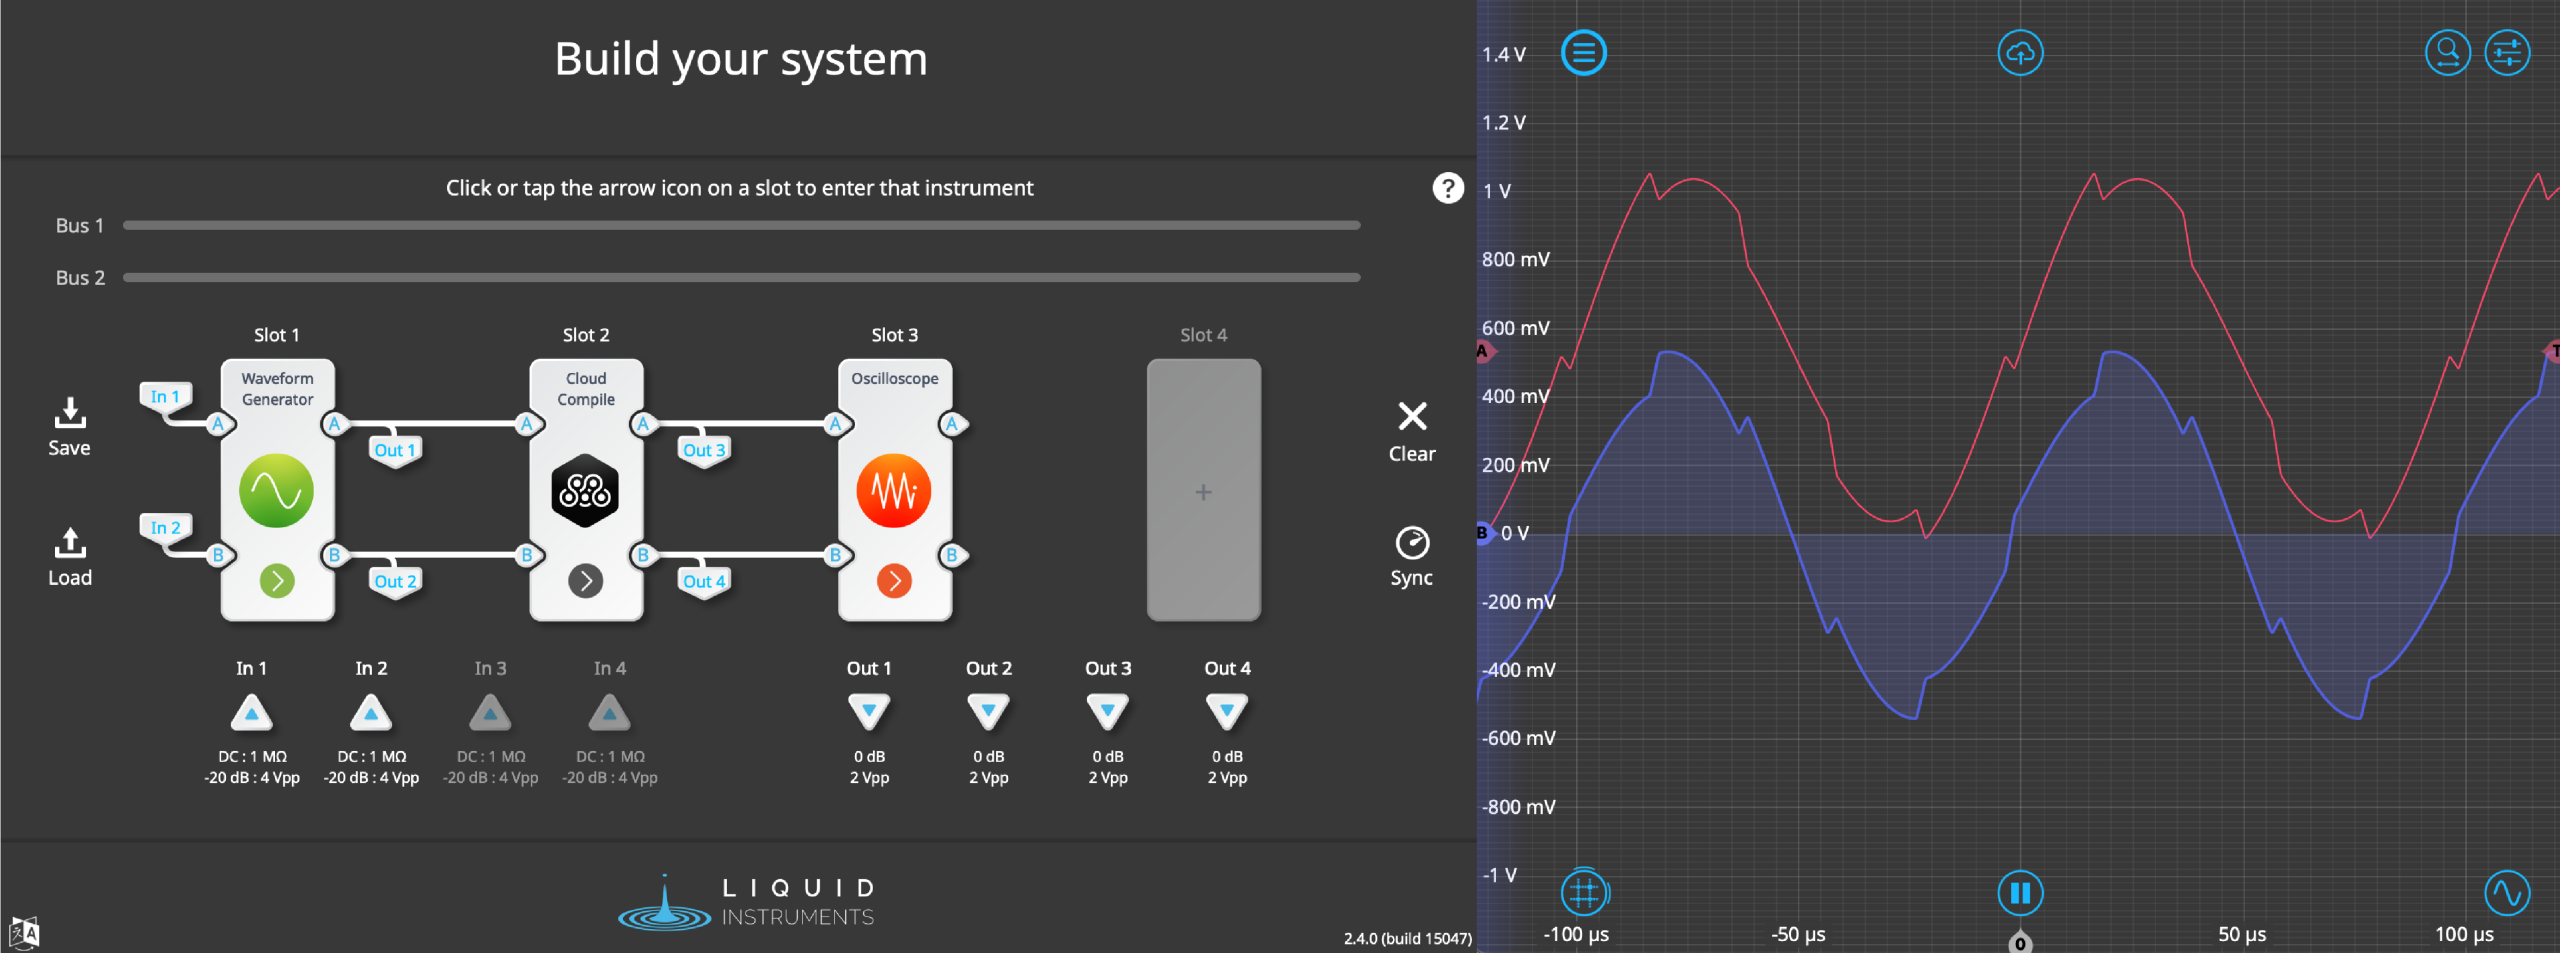
MiM configuration for MCC computing a sum and difference of input signals (left). Signals are generated from a Waveform Generator and results displayed on an Oscilloscope (right)
Next Steps
Moku Cloud Compile is deployed from Multi-instrument Mode, so can be combined with other instruments including Waveform Generators, Oscilloscopes and Spectrum Analyzers in order to help you stimulate and characterize your design. For more information on Multi-instrument Mode, visit the Liquid Instruments website. Further documentation for Moku Cloud Compile is available on its documentation site, and many more examples (including the “square root” example shown below) can be found with full source in our examples repository.

A screenshot from an Oscilloscope deployed alongside a Moku Cloud Compile design. This design is taken from the “Square Root” example with the input signal in blue and the square root of this value calculated in real time, output, and displayed in red.